Quick Start Guide
Get your first domain protected in under 10 minutes — the fastest path to DMARC enforcement
Quick Start Guide
This guide walks you through adding your first domain and getting it protected. The experience differs dramatically depending on whether your domain uses an API-manageable DNS provider — so we cover both paths.
Why API-Managed Domains Are Better
When your domain is hosted on a DNS provider we can connect to via API (Cloudflare, cPanel/WHM, AWS Route53), DMARC Busta can do everything automatically. Here’s the difference:
API-Managed Domain
- SPF, DKIM & DMARC records created automatically
- SPF delegation configured in seconds
- DKIM keys rotated and managed for you
- DMARC policy progresses from none → reject hands-free
- Auto-repair fixes SPF issues without you lifting a finger
- Setup time: ~2 minutes
Manual DNS Domain
- You copy & paste DNS records into your provider manually
- SPF changes require manual DNS edits each time
- DMARC policy upgrades need you to update TXT records
- Auto-repair and Autopilot features limited
- Setup time: 15–30 minutes
Recommendation: Use Cloudflare (Free)
If your domain isn’t currently on an API-manageable DNS provider, we strongly recommend creating a free Cloudflare account and adding your domain there. Cloudflare’s free tier includes full DNS management, and DMARC Busta integrates with it seamlessly. The migration takes about 15 minutes and unlocks the full power of automated email security.
Path A: API-Managed Domain (Recommended)
Cloudflare, cPanel/WHM, or AWS Route53
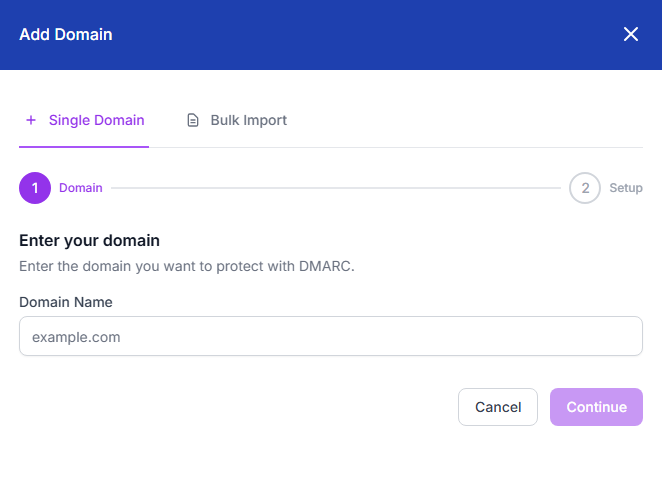
Step 1: Add Your Domain
Click Add Domain from the sidebar menu (available on every page) to open the quick-add panel. Enter your domain name and click Add Domain.
Step 2: Connect Your DNS Provider
After adding the domain, you’ll see the Domain Overview page. DMARC Busta runs an initial scan and detects your current DNS setup. Click Connect DNS Provider to link your Cloudflare, cPanel, or Route53 account.

Cloudflare
Connect via OAuth (one click) or enter your API token. Cloudflare’s free plan works perfectly.
cPanel / WHM
Enter your server hostname and API token. Works with any cPanel-based hosting provider.
AWS Route53
Provide your AWS Access Key ID and Secret. Requires Route53 permissions on the hosted zone.
Step 3: Activate SPF Management
Once your DNS provider is connected, click Activate SPF on the domain overview. DMARC Busta will automatically:
- Import your existing SPF sources from DNS
- Create a managed
_spfdelegation record - Update your root SPF TXT record to point to the managed zone

Step 4: Activate DKIM Management
Navigate to the DKIM tab and click Activate DKIM Management. DMARC Busta will detect existing DKIM selectors, copy their records, and set up NS delegation for key management. New keys are generated and rotated automatically.

Step 5: Enable DMARC Monitoring
Go to the DMARC tab. If you don’t already have a DMARC record, DMARC Busta
creates one with p=none (monitoring mode). Reports start flowing in within 24–48 hours.

Step 6: Turn On Autopilot
With SPF, DKIM, and DMARC all active, go to Settings → Automation and set your automation level to Autopilot. From here, DMARC Busta handles everything:
- AI evaluates and approves legitimate sending sources
- SPF records are updated automatically as sources change
- DMARC policy progresses from
none→quarantine→rejectwhen ready - Progression advances only when your data justifies it

That’s It!
With an API-managed domain, you’re fully set up. DMARC Busta monitors your email authentication 24/7, approves legitimate senders, and progresses your DMARC policy toward full enforcement — all automatically. Check back in a week to see your compliance metrics climbing.
Path B: Manual DNS Setup
For domains not on Cloudflare, cPanel, or Route53
Consider Moving to Cloudflare First
Manual DNS setup works, but you’ll miss out on automated SPF updates, DKIM key rotation, and hands-free DMARC progression. If possible, move your DNS to Cloudflare (free) before proceeding — it takes about 15 minutes and unlocks all automation features.
Step 1: Add Your Domain
Same as Path A — click Add Domain from the sidebar and enter your domain name. DMARC Busta scans your existing DNS records automatically.
Step 2: Copy DNS Records Manually
Without an API connection, you’ll need to add DNS records yourself. The domain overview page shows exactly what records to create. For each record, DMARC Busta provides:
- Record type (TXT, CNAME)
- Hostname (where to create it)
- Value (the record content — click to copy)

You’ll typically need to create these records:
| Record | Type | Purpose |
|---|---|---|
| _dmarc.yourdomain.com | TXT | DMARC policy & report destination |
| yourdomain.com | TXT | SPF record (authorized senders) |
| _spf.yourdomain.com | CNAME | SPF delegation (for managed SPF) |
Step 3: Verify DNS Propagation
After adding the records, click Verify on the domain overview page. DNS changes can take up to an hour to propagate. DMARC Busta will check automatically and update the status when your records are detected.

Step 4: Wait for Reports & Review
DMARC reports arrive within 24–48 hours. Once data starts flowing, review your Security Dashboard and SPF Management pages to approve legitimate sources and monitor compliance.
Manual DNS Ongoing Maintenance
Without API access, you’ll need to manually update DNS records whenever DMARC Busta recommends changes (new SPF sources, DMARC policy upgrades, etc.). You’ll receive email notifications when action is needed. To eliminate this ongoing work, move to Cloudflare.
What Happens Next
First DMARC reports arrive
Receiving mail servers (Gmail, Microsoft, Yahoo) send aggregate reports showing who is sending email as your domain.
Sources identified & approved
AI analyses your sending patterns and approves legitimate services (Office 365, Google Workspace, Mailchimp, etc.).
DMARC policy upgrade begins
When compliance is stable at 95%+, Autopilot begins progressive enforcement: p=quarantine at low percentages, gradually increasing.
Full enforcement: p=reject
Your domain reaches p=reject — unauthorized senders are blocked. Your brand is protected from spoofing and phishing.
Need Help?
If you get stuck at any step, click the Help button (available on every page) for contextual guidance, or contact our support team.